Sunday, August 30, 2009

August's To Do List....


I go back to work on Tuesday. That gives me just two days to finish my list of to dos for the month. It was a huge list, and there are only 3 things left to do. I actually finished up several extra projects and exchange blocks that were not on the original list. I feel good about my accomplishments.


We are seriously trying to find a new home and some acreage just out of town, and that means I'll have to move my fabric stash and my scrapbook stash. It didn't seem like very much when I hauled it into our basement one or two shopping bags at a time!


The two quilt tops pictured above are comfort quilts for the small community of Corbett, which sits in the Columbia Gorge, just 20 miles east of Portland. I quilt with a lovely group of ladies out there.


The one with houses is flannel. Those house squares were rescued from a donated piece that looked like swiss cheese. (someone had fussy cut out the houses they wanted and discarded the rest) it looked pretty hopeless at first, and one of the gals wanted to put it in the garbage. I saw some potential, spotted some more flannel pieces in another box, and remembered some flannel at home that would help.


The blue dresden plate is made of some pillow panels that were printed and sold in the 1980s. There were only 5 in the donation box. It took a group effort, but someone pieced the alternate blocks.... someone else did the four patch, another member added the wide blue print from her stash, and then I brought it home and added the piano keys. It's ready to be quilted by another member.

Saturday, August 29, 2009

Applique Tutorial


Well, I've signed up for another internet block swap.... this one is a Christmas Stocking Block Swap at blockcentral.com . I found an easy way to prep the stocking sections for applique, and wanted to share it with everyone. This will work with any simple shape applique you want to do, and can be adapted for both machine, and hand applique. Try it!


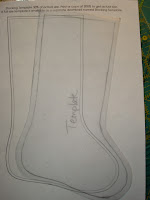
Step 1: print your pattern


Step 2: Using plastic template material, trace your pattern, add seam allowance and cut out.


Step 3: Using whatever method and pattern you decide, create your pieced fabric. Just make sure it's large enough to accommodate your template.


Step 4: Lay the template on your fabric, and trace around it


Step 5: Trace around the shape and cut it out.


Step 6. Lay the template on a lightweight non woven interfacing. I used some grid type pattern material, 'cause it was what I already had. Trace and cut out.


Step 7: Lay the interfacing on the top of the right side of the stocking....


Step 8: Stitch around the shape. All the way around. Do not leave any opening. The more complex the curves, the smaller you want the stitch for a smooth edge. I used a 2 on my stockings.


Step 9: Carefully cut a small hole in the center of the interfacing. clip up the middle and towards the corners. Just enough to be able to turn to the back.


Step 10: Using pinking shears, (mine are scallop shears) Trim the curved areas to make it easier to turn and to reduce fullness.


Step 11: Roll the interfacing to the back, finger pressing the seams so that the interfacing does not show from the front.


Step 12: Turn over and press the interfacing, so that the cut edges are close together. You do not have to stitch them together. Press lightly.


Step 13: Turn to the right side, and press well... making sure that the interfacing is all on the back side.


Step 14: Position on the background square. (If you will be machine stitching, I suggest that you use some starch on the background before pinning the stocking down. This will make it easier to stitch.)


Step 15: Add the top cuff. Then applique with your desired method.


I hope you enjoy using this method. It makes it so easy to get a nice clean edge, with no raw strings to deal with.

Monday, August 24, 2009

Boysenberry Jam

I can't say I've been as industrious as some. There are many out there this time of year, making jam, jelly, relish, putting up veggies no matter how hot it gets in the kitchen.... My hats off to all of you.... I used to help my mom do alot of canning. For some reason, DH does not like home canned food. I made jam the first year we were together, and he never ate it. I'm not going to all that work if he would rather have it from the store shelves....
I made this quilt a year and a half ago. All the colors reminded me of good, boysenberry jam! This quilt went to our good friend Jane, who loves purple.

Monday, August 17, 2009

Disapearing Nine Patch Quilt

I think the back of this quilt is as pretty as the front! This is a Disappearing Nine Patch. I made this quilt as a community comfort quilt for an outreach program in Corbett, Oregon. I quilt with some ladies who live in the community. I try to finish at least one quilt for their comfort quilts each year as part of being in the group. We were attempting to use up some donated scraps that were in the back room. I noticed as we were cutting strips, that were were several in this color combination and decided to take them. I finally got it done an quilted this last week! This is such a versatile block.... It's great for using up stash..... something I personally have a lot of. I'm a lucky girl!

Getting Things Accomplished

Well, I had promised myself that I would clear the pile of projects that needed finishing. As you can see from my August to do list, I'm cruising right along.... it feels great to get some of these done.... I am part of a group that started some quilts for a local hospice house 2 years ago. One of our members purchased a whole lot of clearance fabrics, (bless her heart, she is not a quilter, and thought she was doing us a favor... I'm not sure how many hospice patients want a Christmas quilt..... but we're gonna find out! I did make doll quilts for another local charity out of many of the prints a couple of years ago. It just seemed more appropriate use of the novelty prints.) The pattern we used is called "One Block Wonder" I used this because it is very forgiving when non-quilters are helping out. No two seams match if you rotate every other block, and there are no star points to cut off. Even then, it was a challenge to quilt a couple of these, as they look pretty wavy when laid out. I have had to keep myself from undoing the work of others in the group.... Since I'm the one with the largest sewing machine, I'm the one that has done the majority of the quilting..... a couple of members have given it their best attempt. That was all we asked. these are two of those quilts.... We have more in the works...

I Have Yellow Finches!

I love feeding the birds in my yard! I've lived here for 15 years, and have fed the birds since the day we moved in. I get lots of juncos, chicadees, sparrows, bushtits, red finches, etc. I even get the occassional scrub jay. I have tried for years, to attract goldfinches to my yard. I think the cat might have something to do with this... they can be flighty birds.... this characteristic makes it difficult to get pictures of them, especially with my small camera. but on two seperate occassions, I have been able to get pics. I have several feeders... one with a patio mix of sunflower seeds, peanuts,and a small amount of millet. The other has niger seed in it. They have such a pretty song. I got th picture of the three on the one feeder through my kitchen window screen the other day.

Sunday, August 2, 2009

First quilts....

Ok, so what was your first quilt? I started my first quilt in 1974. I was taking a quilt class with my sister in law. My older sister, Lynda, saw some of the blocks I was appliqueing, and said I could give it to her.... LOL . I decided to do just that. I managed to finish 25 blocks and set them with a then stylish coin gold sheet. (YUCK). I presented it to Lynda for Christmas, with the intention of finishing it. I was in college at the time, and didn't have the space, the time, or the knowledge to actually hand quilt this king size monster I had created.
Over the next several years, I would come across that top as I was moving, or doing some deep cleaning. At one time, my sis and I talked about resetting it in a blue floral.... that never happened either.
It wasn't until 1999, that I dug that gold monster out of the tote it was in. (now.... I had actually purchased some poly batting for this in the 70's. I had wrapped that batting in a piece of cotton ducking fabric, tied it with twine, and hung it from the ceiling joists in my Mom's basement. It looked like a striped blimp hanging in the corner.) I had since used that batting on some baby quilts after Mom insisted I get it out of her basement sometime during the mid 80's.
Don't get me wrong.... I love the color gold, and have plenty of it in my support stash.... but that coin gold sheet was UGLY as sin! I finally decided to tear it all apart. I then put the bright blocks in one pile, and the pastels in another. more brights than pastels.... I chose two different settings, and treated each pile differently. The pastels I set with alternate white blocks, and quilted by machine with my first attempt at feathers. The brights I set in attic windows with black sashing. With Christmas just around the corners, and it being the 25th anniversary of my first attempt to give the quilt to Lynda, I put them in the washer and dryer.
Argh! some of the fabrics I had picked in 1974 were not 100% cotton, were not tightly woven, and had frayed when I washed the bright quilt. My origial zig zag was not close enough together, nor wide enough to firmly hold the fabric. I also didn't quilt it quite close enough to support the pieces in the washing process.
Christmas day came, and I presented Lynda with both quilts, and then promptly took the one that needed repair away from her.... "I'll figure something out to fix it" I told her....
That quilt made it's way to the bottom of a pile, and then to the bottom of a tote in my sewing room, and became forgotten over time.... This spring, Lynda mentioned that the quilt she used all the time was in need of repair.... It was raveling like the darker one had in a couple of places....
I am now proud to say.... that I have mended both of those quilts.... re zigzaged all the flower petals, (through the batting), and added extra quilting on each petal to help keep them from lifting and shifting. I will be giving her these tomorrow. Both of these quilts are pictured here. They have been a true learning experience for me.